One of the things that I struggled to get my head around when I started working with p5.js was how to integrate sketches to my web pages. As someone who started out in this library, It wasn’t obvious to me how to use javascript and integrate it with the page elements. So I decided to put together this tutorial so both as an educational resource but practice for myself. The first thing I’m going to do is create a basic sketch with p5.js. I have a concept in mind of a 3D floating sphere that changes colors when different buttons on the page are pressed. To start off, I create a basic html page with all of the basic things I need:
<html>
    <head>
        <meta charset="UTF-8">
        <title>My Sketch</title>
        <!-- The p5.js Library -->
        <script src="p5.min.js"></script>
    </head>
    <body>
        <!-- Div element for the p5.js sketch. -->
        <div id="sketch-div"></div>
    </body>
    <!-- Script element for the sketch. -->
    <script>
  	// Sketch goes here.
    </script>
</html>
I attach a script element at the bottom, and this is where I will write my custom sketch. Don’t forget to embed the p5.js library. I also added a custom div that I will later use to contain my sketch. This is the basic sketch that I start with:
        function setup(){
            createCanvas(300, 300, WEBGL)
        }

        function draw() {
            sphere()
        }
This calls two functions, draw(), and setup(), which every p5.js
needs to display. This is what I get when I launch my html file in the
browser, so I know everything is working correctly: 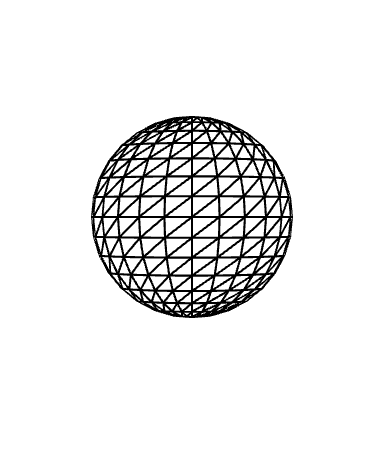
Using the sphere() function inside of the draw() function will draw a sphere of a default size directly in the center of the canvas. Now that everything is working properly, It’s time to add some styling. I add this code directly before my sphere() function:
// Lighting and Styling
            lights()
            noStroke()
            ambientMaterial('green')

            sphere()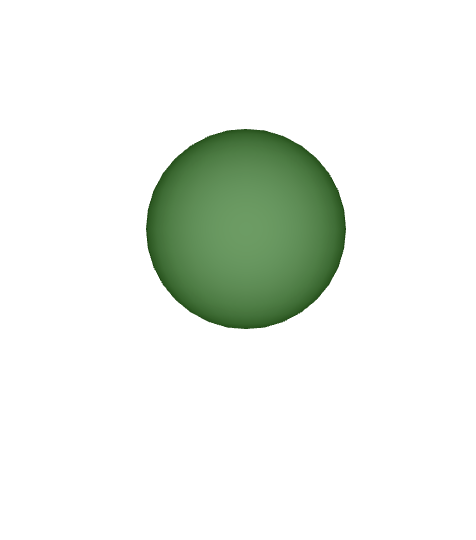
I kept thing simple with just a simple ambient material which sets a general color for the 3D object. I removed the wireframe with noStroke(), and added some lighting with lights(), which is neccesary or your sphere will be in pitch black darkness.
Now, time to program Interactivity. I want to create a function that
allows me to change the color of the object. The first thing I need to
do, since I know the color argument of ambientMaterial() will be
changing, I will make this value a variable mycolor, which
i can manipulate using a function:
function setColor(string) {
            myColor = string
        }
when I call this function in draw() with
setColor([color]), I can change the color. But now I want
to create code that changes this variable based on the input recieved
from html buttons. First, I create the buttons:
  <p>Click a button to update the color!</p>

        <!-- Buttons to Control the Color -->
        <button id = "yellow-button">Yellow</button>
        <button id = "red-button">Red</button>
        <button id = "green-button">Green</button>
With these buttons created and labeled, I go back to my script, and add the following variables to reference them:
// Default variable for sphere color.
 let myColor = ''

        let redButton = document.getElementById('red-button');
        let yellowButton = document.getElementById('yellow-button');
        let greenButton = document.getElementById('green-button');
then comes the new functions to change the color.
         greenButton.addEventListener('click',
         () => {myColor = 'green'})

         redButton.addEventListener('click',
         () => {myColor = 'red'})

         yellowButton.addEventListener('click',
         () => {myColor = 'yellow'})

</script>
I delete the function from earlier, and add an Event Listener, which
takes two arguments, an event, and the action to be taken. This function
waits for the event to take place, then execures the function in the
second argument. I input an anymous function that changes the value of
myColor to a set string. .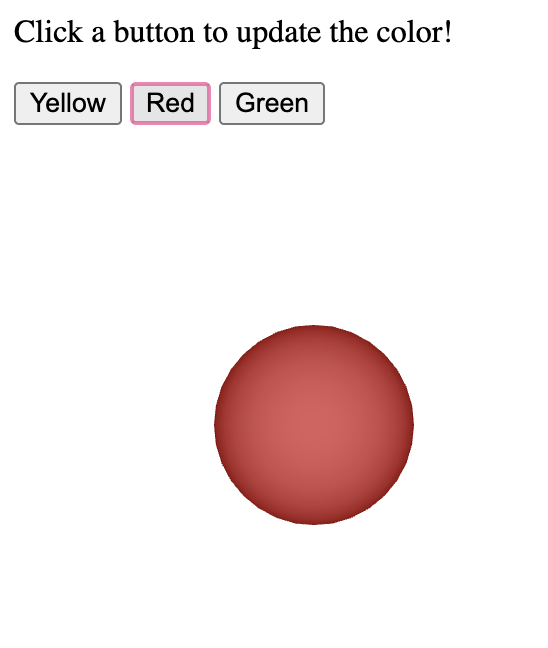 and that’s it! Now the only thing left to do is add some styling. I use
the custom ID tag to identify and style the p5.js Canvas and attach it
to a
and that’s it! Now the only thing left to do is add some styling. I use
the custom ID tag to identify and style the p5.js Canvas and attach it
to a <div> block using this code:
  function setup(){
            let sketchDiv = document.getElementById('sketch-div')
            let divWidth = sketchDiv.clientWidth;
            let divHeight = sketchDiv.clientHeight;
            let myCanvas = createCanvas(divWidth, divHeight, WEBGL);
            myCanvas.parent('sketch-div');
        }
this allows me to fit the p5.js canvas element to the custom div element. Make sure to include this code in your stylesheet:
.p5Canvas {
            position: absolute;
        }
you can style the #sketch-div element however you want.
Make sure you add a height and width, otherwise your div and canvas will
be empy. I added my final styling and this is what I ended up with: 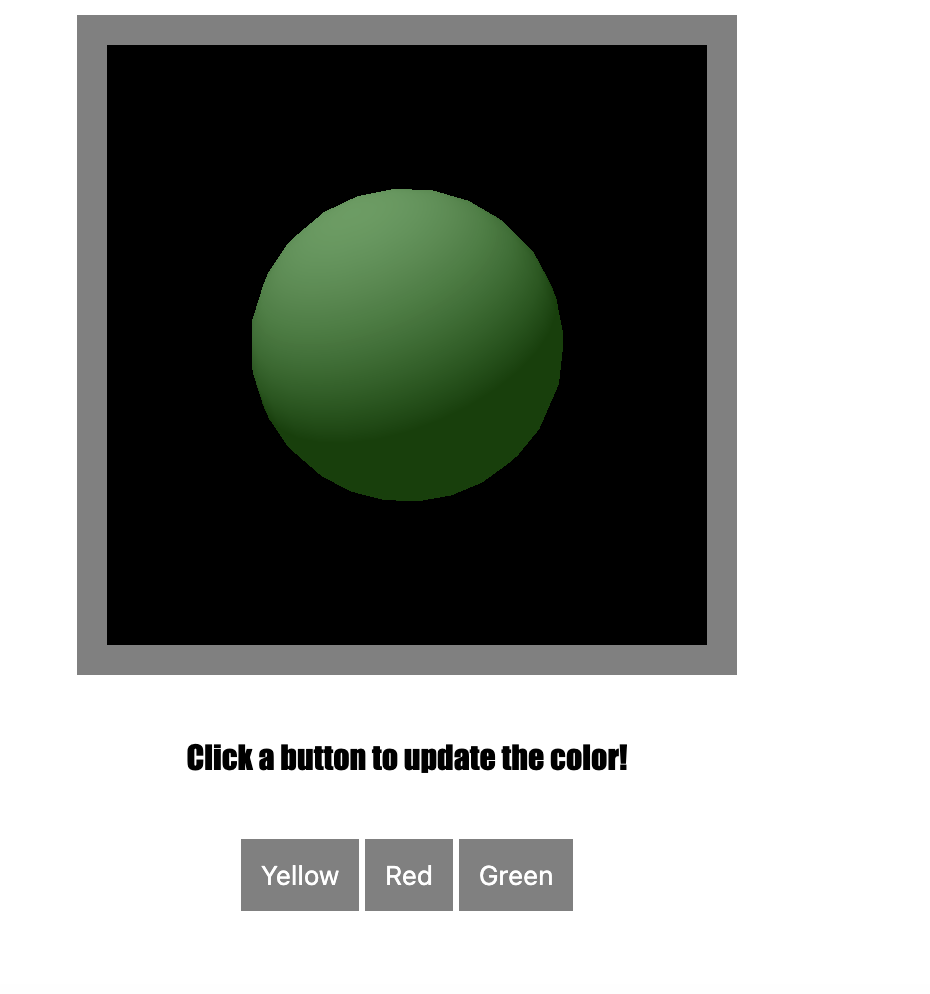
see the full code below:
<html>
    <head>
        <meta charset="UTF-8">
        <title>My Sketch</title>
        <!-- The p5.js Library -->
        <script src="p5.min.js"></script>
    </head>
    <body>
        <div id ="container">

         <!-- Div element for the p5.js sketch. -->
         <div id="sketch-div"></div>
        </div>
        <p>Click a button to update the color!</p>
        <div id="button-div">
         <!-- Buttons to Control the Color -->
         <button id = "yellow-button">Yellow</button>
         <button id = "red-button">Red</button>
         <button id = "green-button">Green</button>
        </div>

          <!-- Script element for the sketch. -->
    <script>
        // Interactivity:
        //Click and Drag the scene to orbit, click the buttons to change the color of the sphere.


       //    Set the default color
       let myColor = ''
        // Set a reference to each button ID
        let redButton = document.getElementById('red-button');
        let yellowButton = document.getElementById('yellow-button');
        let greenButton = document.getElementById('green-button');

        function setup(){
            // Initiate variables for the sketch-div element dimensions.
            let sketchDiv = document.getElementById('sketch-div')
            let divWidth = sketchDiv.clientWidth;
            let divHeight = sketchDiv.clientHeight;
            let myCanvas = createCanvas(divWidth, divHeight, WEBGL);
            // Attach the parent element.
            myCanvas.parent('sketch-div');

            // A description of the sketch, for accesibility.
            description('A 3D sphere on a grey background.')
        }

        function draw() {

         background('black')

         // Add orbit control.
         orbitControl()


         //  Syle the sphere.
         lights()
         noStroke()
         ambientMaterial(myColor)
         //Model the sphere.
         sphere()
        }

         // check if buttons are clicked with Event Listeners.
         greenButton.addEventListener('click',
         () => {myColor = 'green'})

         redButton.addEventListener('click',
         () => {myColor = 'red'})

         yellowButton.addEventListener('click',
         () => {myColor = 'yellow'})

    </script>
    <style>
        body {

            font-family: Impact, Haettenschweiler, 'Arial Narrow Bold', sans-serif;
            display:flex;
            flex-direction: column;
            justify-content: center;
            align-items: center;
            gap: 15px
        }

        #button-div {
            flex-direction:row;
        }

        button {
            flex-direction: row;
            padding: 10px;
            background-color: grey;
            color:white;
            border:none;
        }
        #sketch-div {

        width: 300px;
        height: 300px;

        }
        #container {
            background: grey;
            padding: 15px;
            height:300;
            width: 300;

        }
        .p5Canvas {
            position: absolute;
        }
    </style>
    </body>
</html>